Thursday, May 24, 2012

Light Strawberry Flower Cake


In the words of Hannibal Smith, "I just love it when a plan comes together!"  About a week ago my friend Ginny and I were working out and discussing that our friend Leah's 30th birthday is today.  We knew that she wasn't thrilled about turning the big 3-0 so we decided to throw her a small surprise party.  We only had 5 days to plan the party since she will be out of town the weekend of her birthday and we wanted to do it before she left.  We brainstormed some ideas and came up with a plan.  We divided up the tasks and one of my jobs was to bake the cake.  Since strawberries are in season it was an easy decision to do a strawberry cake.

The hard part was deciding which strawberry cake recipe to choose.  I wanted to find an easy, light recipe.  I searched through some of my favorite sites and found Sweetheart Strawberry Cupcakes recipe at www.dashingdish.com.   Dashing Dish is one of my favorite food blogs.  The author truly has a heart for the Lord and she is so stinkin' adorable too!  All the recipes are her own creation and healthy.  So far, all the recipes I have tried have been great!


Her strawberry cupcake recipe couldn't be simpler.  It is just a strawberry box cake mix and red soda (diet or regular).  That's it! I had my doubts, but it was surprisingly good and really moist.


Instead of cupcakes, I planned to make a 2 layer cake, but I didn't let one of the layers cool completely after baking and when I tried to remove it from the cake pan it broke apart.  So I had to bake another cake mix and ended up using all 3 layers for the cake.  It was a yummy mistake since we got to eat the messed up layer, and it worked out for the best since three layers is really the perfect height for this cake.


After deciding on the cake recipe, I had to decide how to decorate it.  I am not a cake decorator.  So I needed a really simple design.  I searched through www.pinterest.com for ideas and came across a cake with a flower made from strawberries from Lick the Bowl Good  food blog.  She showed a step by step tutorial on how to make the flower.  It looked so easy I knew even I could do it.  Here's how.

Place sliced strawberries in a circle along the outer edge of the top of the cake.

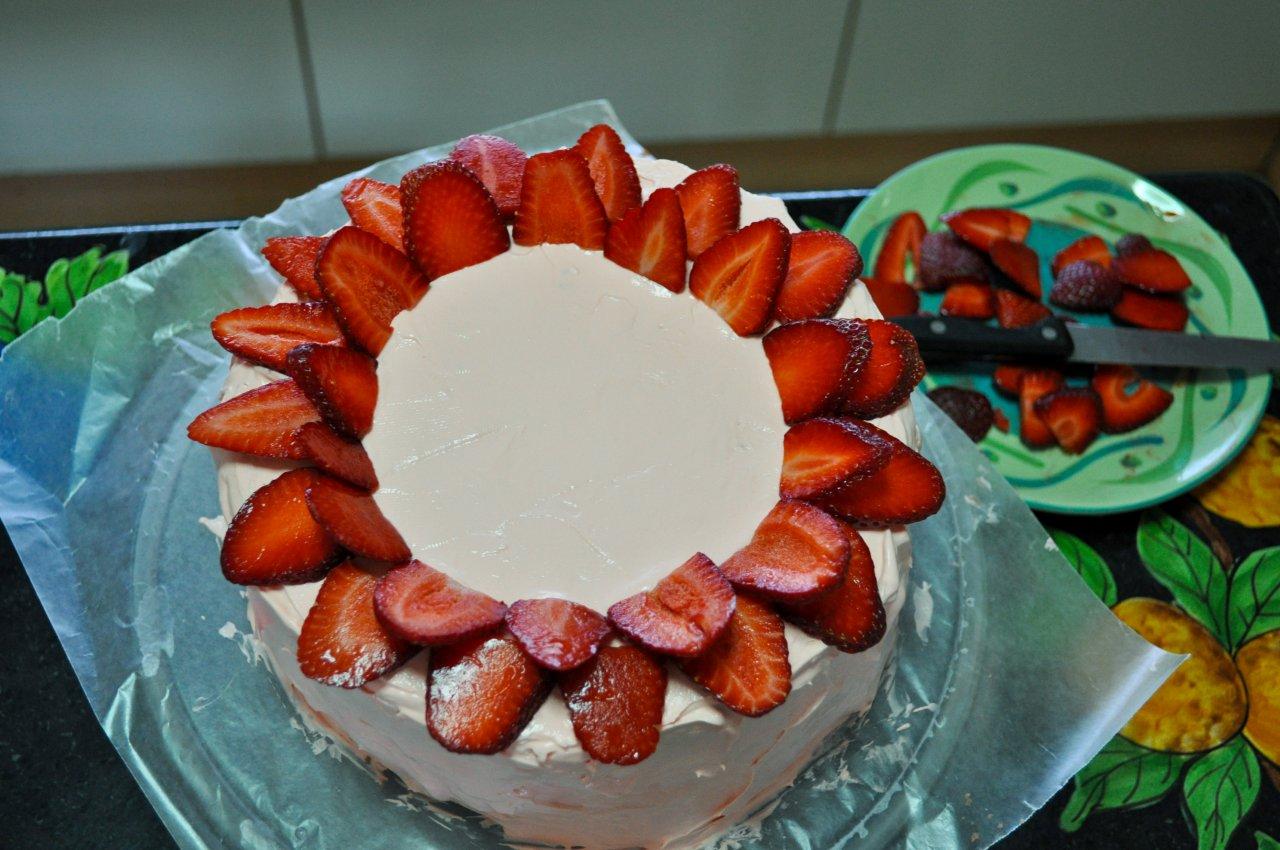
Add another layer of sliced strawberries inside the outer layer of strawberries.

Repeat layering until cake is covered. Place a whole strawberry in the center to finish.
I added the white sprinkles by throwing them at the cake allowing them to stick where they landed. There were lots of little white balls all over my kitchen floor :) I also added strawberry halves along the base of the cake.


<><>
I was so pleased with the final result!


The party turned out great and everything came together in just a few days.  I feel extremely blessed to have such good friends to share life's milestones.  Happy 30th Birthday Leah!!


Light Strawberry Cake 
adapted from: www.dashingdish.com
yield: 12 servings

Ingredients:


Cake:
2 strawberry box cake mixes
2 (12 oz.) cans or 3 cups diet or regular red soda


Icing:
12 oz. light Cool Whip
2 (1.4 oz.) sugar free vanilla pudding mixes
1 1/2 cup skim milk
Red or pink food coloring
  • Preheat oven to 350 degrees. Grease and flour cake pans. Beat cake mix and soda together until smooth and creamy.
  • Divide the batter into four 8 or 9 inch cake pans. If you don't have four cake pans, divide the batter in half setting aside one half of the batter. Pour divided cake batter into two 8 or 9 inch round cake pans.
  • Bake according to instructions on box.
  • While cake is baking, mix together pudding mix, milk, Cool Whip, and food coloring. Slowly beat or whisk whipped topping until all of the ingredients are just combined. (Be careful not to over mix). Add as much food coloring you need in order to get the color you desire. Chill in fridge until ready to use.
  • Allow the cakes to completely cool before removing from pan or you may end up with a yummy mistake like I did! Once cooled, dump onto cooling rack.
  • Regrease and flour pans and bake the rest of the batter dividing it into the 2 pans. Since this is a three layer cake you will have one layer left over. One option is to make cupcakes instead of the fourth layer or make a four layer cake. You may need to prepare more icing than the recipe calls for.
  • Bake layers/cupcakes according to box instructions. Allow to cool. Once the layers are completely cooled begin assembling the cake.
  • Spread a layer of icing on top of the bottom layer. Place the second layer on top of the bottom layer. Spread a layer of icing on the second layer and place the third layer on top. Cover the cake with icing. The nice thing about whipped icing is that unlike buttercream it doesn't need to be smooth to look good. The messier, the better. Decorate with strawberries and sprinkles.
Tips:
  • I baked the layers the day before and wrapped them individually in plastic wrap until I was ready to assemble the cake. This made the cake even moister than it would have been if I had served it the same day it was baked.
  •  I placed a piece of wax paper under the cake and used the paper to turn the cake while icing it.  This made it much easier to decorate and maneuver the cake.  After decorating the cake I tore the wax paper so that it couldn't be seen.
Per Serving:
Calories: approx. 325 using regular soda 300 using diet soda
Fat: 5 grams


Buon Appetito!


Monday, May 21, 2012

Marinated Grilled Veggie Skewers


These delicious marinated grilled veggie skewers would make a perfect addition to your Memorial Day cookout. I made this recipe several weeks ago when we had our Italian friends over for dinner and karaoke. We planned to cookout steaks and chicken so when I came across this recipe I thought it would be a perfect compliment. It is super easy and doesn't take a lot of time to prep which is great when trying to prepare several other dishes. The marinade can be made the day before and then simply add the veggies a couple hours before grilling.


These veggies made such a pretty presentation and were a big hit with everyone at the party. They are really healthy so you can save those calories for dessert!


I used the recipe as a guide, but didn't follow it exactly. You can use whatever vegetables you like. I did not add the crushed red pepper since I wasn't sure if my guests would like them spicy.


Marinated Grilled Vegetable Skewers Recipe

Ingredients:
Veggies:
1/2 C. thickly sliced zucchini
1/2 C. red bell pepper chunks
1/2 C. yellow bell pepper chunks
1/2 C. thickly sliced yellow squash
1/2 C. wedged red onion
16 fresh mushrooms
16 large cherry tomatoes
Wooden skewers


Marinade:
1/2 C. olive oil
1/3 C. soy sauce
1/3 C. lemon juice
2 tbsp. balsamic vinegar
3 cloves garlic, crushed
2 tbsp. honey
2 tsp. dried oregano
1/2 tsp. crushed red pepper (optional-- only if you like heat)


Instructions:
1. Place all your veggies in a large mixing bowl or resealable plastic bag.
2. In a separate small bowl, combine the marinade ingredients.
3. Pour over veggies and marinate at least 30 minutes, up to 2 hours.
4. Soak skewers one hour in water.
5. Preheat the grill to medium heat.
6. Place your veggies on the skewers, dividing them evenly. Reserve the marinade.
7. Grill veggie skewers directly on oiled grill rack for about 15 minutes, till crisp-tender. Brush occasionally with reserved marinade.


Cold Marinated Veggie Variation: Don't have time or space to make your veggies on the grill? Turn your veggies into a cold salad, instead.
If you know you're tight on time, this is a good element of your dinner party menu for the grill to make ahead of time. In this case, you can take carrot slices, chopped Brussels sprouts, broccoli, asparagus, and cauliflower and turn them into a cold salad by simply adding some chunks of provolone, mozzarella, salami, ham, and a little vinaigrette – fast, easy and very appealing!


Buon Appetito!

Monday, May 14, 2012

Coffee Angel Food Cake


I found this recipe when looking for a dessert to take to a "healthy" themed potluck.  I could have taken the usually healthy foods like salads, fruit, or baked chicken, but I really wanted to find a yummy dessert.  When I found this recipe I couldn't wait to try it since coffee and angel food cake are two of my favorite foods.

My sophomore year of high school I went on a diet to lose 25 pounds.  Angel food cake and frozen yogurt (not together) became my go-to desserts.  Angel food cake is fat free and much lower in calories than regular cake so I could eat as much as I wanted without feeling guilty.  I ate A LOT of angel food cake back in the day.  Now I am much more aware of the importance of portion control, because too much of a good thing can be bad as well.  Ya know?

This cake was so good, but of course anything with coffee is a winner in my recipe book!!


Coffee Angel Food Cake

source: Cooking Light
Yield: 12 servings


Ingredients 

  • 1 tablespoon instant coffee granules
  • 1 tablespoon water
  • 1 (14.5-ounce) box angel food cake mix
  • 1 teaspoon almond extract
  • 1 teaspoon vanilla extract
  • 2 tablespoons instant coffee granules
  • 1 tablespoon water
  • 6 tablespoons stick margarine, softened
  • 1 (1-pound) box powdered sugar
  • 3 tablespoons skim milk

Preparation

  1. Combine 1 tablespoon coffee granules and 1 tablespoon water in a small bowl; stir well, and set aside.
  2. Prepare angel food cake batter according to package directions. Fold in coffee mixture and extracts. Spoon batter into an ungreased 10-inch tube or bundt pan, spreading evenly. Break large air pockets by cutting through batter with a knife. Bake at 375° for 30 minutes or until cake springs back when lightly touched. Invert pan, and let cool for 40 minutes. Loosen cake from sides of pan, using a narrow metal spatula. Invert cake onto a serving plate; set aside.
  3. Combine 2 tablespoons coffee granules and 1 tablespoon water in a small bowl; stir well, and set aside.
  4. Cream margarine at high speed of a mixer. Add coffee mixture; beat well. Gradually add powdered sugar, beating at medium speed until well-blended. Add milk; beat well. Spread frosting over top and sides of cake. Store loosely covered in refrigerator.
per serving
Calories: 292
Fat: 5.8g

Buon Appetito!


Friday, May 11, 2012

Cheesy Beef and Tomato Lasagna Roll-Ups


In my last post I mentioned that some ingredients are not easy to come by here in Italy. Case in point, the original version of this recipe calls for manicotti noodles. I couldn't find manicotti or even cannelloni noodles at the Commissary. I live in the pasta capital of the world, but really didn't feel like braving the Italian traffic to hunt down some manicotti. Recently, I have seen several recipes for lasagna roll-ups so I decided to try lasagna instead. I simply boiled 12 noodles, drained and blotted dry then spread the filling on each noodle and rolled them.


It was so much easier than trying to stuff cooked manicotti.  The recipe also calls for a can of diced tomatoes and green chilies with garlic, oregano, and basil of which I couldn't find.  Instead, I used a can of Rotel (for a little kick) and simply added some fresh basil, dried oregano and fresh garlic.  It can be frustrating to not be able to find needed ingredients, but there is usually a similar ingredient that can be substituted.

Many of you know that I often alter recipes to make them a little more figure friendly.  This recipe calls for Italian sausage which is very tasty, but also very fattening.  A healthier option is to use lean ground beef and add Italian seasoning, salt, pepper, and fennel seeds.  I calculated the calories and fat grams for each version and was amazed at the difference made by simply altering a few ingredients.

I was so pleased with how this recipe turned out using lasagna noodles and low fat ingredients that I will make it like this from now on.

These are generous serving sizes. I typically eat 1/2 of a serving (one lasagna roll-up) with a salad or side veggie and a slice of bread for a well-balanced delicious meal.


Cheesy Sausage and Tomato Manicotti ~ Original Version 
Southern Living
Yield: 6 servings
Calories 801 per serving
Fat grams 52

Ingredients 

  • 1 (8-ounce) package uncooked manicotti noodles
  • 1 (15-ounce) can tomato sauce
  • 1 (10-ounce) can diced tomatoes and green chilies with garlic, oregano, and basil
  • 1 pound Italian pork sausage
  • 1 (8-ounce) package cream cheese
  • 1 cup ricotta cheese
  • 4 cups (16 ounces) shredded mozzarella cheese, divided
  • 1/2 cup chopped fresh parsley (optional)

Preparation

  1. Cook pasta according to package directions; rinse with cold water. Drain.
  2. Process tomato sauce and diced tomatoes in a blender 20 seconds or until smooth. Set aside.
  3. Remove casings from sausage, and discard. Cook sausage in large skillet over medium-high heat, stirring until meat crumbles and is no longer pink. Stir in cream cheese, ricotta cheese, and 2 cups mozzarella cheese. Spoon into manicotti shells; arrange stuffed shells in lightly greased 13- x 9-inch baking dish.
  4. Pour tomato mixture over shells; sprinkle with remaining 2 cups mozzarella cheese.
  5. Bake at 350° for 20 minutes or until cheese is melted and bubbly. Let casserole stand 10 minutes before serving. Sprinkle top with chopped fresh parsley, if desired.
  6. Note: Casserole may be assembled and frozen up to 1 month. Thaw in the refrigerator overnight; bake, covered, at 350° for 30 minutes. Uncover and bake 15 more minutes or until cheese is melted and bubbly. If you prefer a smaller casserole, use 2 (11- x 7-inch) baking dishes. Proceed as directed.


Cheesy Beef and Tomato Lasagna Roll-Ups ~ Figure Friendly
6 servings
adapted from Southern Living
Calories 587
Fat grams 23

Ingredients

  • 12 uncooked lasagna noodles
  • 1 (15-ounce) can tomato sauce
  • 1 (10-ounce) can diced Rotel added approximately 2 cloves garlic, 1 tsp. dried oregano, and 1/4 cup fresh basil leaves or 1 tsp. dried basil
  • 1 pound 94% lean ground beef
  • 1 tsp salt
  • 1 tsp pepper
  • 1 tsp fennel seeds
  • 1 (8-ounce) 1/3 less fat package cream cheese
  • 1 cup low fat ricotta cheese
  • 4 cups (16 ounces) reduced fat shredded mozzarella cheese, divided
  • 1/2 cup chopped fresh parsley (optional)

Preparation

  1. Cook pasta according to package directions; rinse with cold water. Drain and pat dry.
  2. Process tomato sauce and diced tomatoes in a blender 20 seconds or until smooth. Set aside.
  3. Cook ground beef in large skillet over medium-high heat, stirring until meat crumbles and is no longer pink. Stir in cream cheese, ricotta cheese, and 2 cups mozzarella cheese. Spread mixture on cooked shells and roll. Place in lightly greased 13- x 9-inch baking dish.
  4. Pour tomato mixture over shells; sprinkle with remaining 2 cups mozzarella cheese.
  5. Bake at 350° for 20 minutes or until cheese is melted and bubbly. Let casserole stand 10 minutes before serving. Sprinkle top with chopped fresh parsley, if desired.
  6. Note: Casserole may be assembled and frozen up to 1 month. Thaw in the refrigerator overnight; bake, covered, at 350° for 30 minutes. Uncover and bake 15 more minutes or until cheese is melted and bubbly. If you prefer a smaller casserole, use 2 (11- x 7-inch) baking dishes. Proceed as directed.


Buon Appetito!

Monday, May 7, 2012

Strawberry Pudding Trifle


I couldn't let another strawberry season pass without sharing this recipe.  This is one of my all-time favorite desserts.  This recipe was created by my sister's mother-in-law who is a fantastic cook.  She served this at my sister's bridal shower, and it was truly love at first bite.  I think I asked her 3 times before the shower was over if I could PLEASE have the recipe.  I am sure she thought I was crazy, but I could not help myself.  I HAD to have the recipe.


Here in Italy we don't have access to all the varieties of food products that are available in the states.  It forces me to be creative or at least attempt to be creative.  This recipe calls for strawberry glaze and chocolate graham crackers.  Neither of which are available at my local Commissary so I had to tweak this recipe a bit.  I made homemade strawberry glaze and chocolate cookies to substitute for the store bought strawberry glaze and chocolate graham crackers.  I also used low fat ingredients for a more figure friendly version. It still turned out great!  These changes are a little time consuming so if you are short on time and the ingredients are available, I would definitely suggest using store bought strawberry glaze and chocolate graham crackers.


Strawberry Pudding Trifle ~ Original Version

Prep time: 30 minutes                                                                             Serving Size 12
1 (8 ounce) package cream cheese
1 (14 ounce) can sweetened condensed milk
1 (5 ounce) package instant white chocolate pudding mix (or cheese cake flavor pudding)
3 cups cold milk
1 tsp vanilla extract
1 (8 ounce) container frozen whipped topping, thawed
2 (16 ounce) containers of frozen sweetened strawberries
1 carton (16 ounce) strawberry glaze
2 T. cornstarch
Chocolate Graham Crackers, crumbled

1.       In a large bowl, beat cream cheese until fluffy. Beat in condensed milk, pudding mix, cold milk and vanilla until smooth. Fold in ½ of the whipped topping.


2.     Place frozen strawberries in a saucepan. Gradually moisten 2 T. cornstarch with water until it forms a paste. Add enough water to thin this paste to the consistency of buttermilk, stir into berries. Cook and stir until thick. Cool and mix in glaze.

3.      Layer trifle bowl with crumbled chocolate graham crackers, strawberry mixture, and pudding mixture. Repeat twice and top with remaining whipped topping. Chill. Garnish with crumbled crackers and/or strawberries before serving.


Strawberry Pudding Trifle ~ Joy's Version

Prep time: I have no idea                                           Serving Size 12
1 (8 ounce) 1/3 less fat package cream cheese
1 (14 ounce) can fat free sweetened condensed milk
1 1/3 package instant sugar free white chocolate pudding mix
3 cups cold 1 % milk
1 tsp. vanilla extract
1 (8 ounce) container frozen light whipped topping, thawed (I think I used a little more than the recipe calls for)
32 ounces fresh strawberries
16 ounce strawberry glaze (see recipe below)
2 T. cornstarch
Mom's Famous Chocolate Cookies, crumbled (see recipe below)

1.   In a large bowl, beat cream cheese until fluffy. Beat in condensed milk, pudding mix, cold milk and vanilla until smooth. Fold in ½ of the whipped topping.
2.   Place strawberries in a saucepan. Gradually moisten 2 T. cornstarch with water until it forms a paste. Add enough water to thin this paste to the consistency of buttermilk, stir into berries. Cook and stir until thick. Cool and mix in glaze.

3. Bake cookies and allow to cool.
4.   Layer trifle bowl with crumbled chocolate cookies, strawberry mixture, and pudding mixture. Repeat twice and top with remaining whipped topping. Chill. If desired, garnish with crumbled cookies and strawberries.


Strawberry Glaze
adapted from www.recipes.com

2 cups chopped strawberries, washed and hulled
2/3 cup honey
2 T. cornstarch
2 T. water

1. In a saucepan place strawberries and honey. Cook over medium heat until thoroughly mixed and heated through. Remove from heat.

2. In a small bowl combine cornstarch and water stirring to combine. Add cornstarch mixture to strawberry mixture. Return to stove top and cook over medium heat for approximately 5 minutes, stirring frequently, until thickened.


Mom's Famous Chocolate Cookies
Yield: about 5 dozen
adapted from Southern Living All-Time Favorite Chocolate Chip Cookies
  
3/4 cup butter, softened
3/4 cup granulated sugar
 3/4 cup firmly packed dark brown sugar
 2 large eggs
 1 1/2 teaspoons vanilla extract
 1 3/4 cups plus 2 Tbsp. all-purpose flour
3/4 cup cocoa
 1 teaspoon baking soda
 3/4 teaspoon salt
 Parchment paper

1. Preheat oven to 350°. Beat butter and sugars at medium speed with a heavy-duty electric stand mixer until creamy. Add eggs and 1 1/2 tsp. vanilla, beating until blended.

2. Combine flour, baking soda, and salt in a small bowl; gradually add to butter mixture, beating just until blended. Drop by tablespoonful onto parchment paper-lined baking sheets.

3. Bake at 350° for 10 to 14 minutes (I bake them 12 minutes) or until desired degree of doneness. Remove to wire racks, and cool completely (about 15 minutes).


Buon Appetito!